On Process: Planning for Tech Success in Government

In this long-overdue reboot of the Savage Internet blog, I talk about setting up a modern web application development environment at the City of Toronto, as part of my Code for Canada fellowship project. This is a follow-up to this less technical intro on our team Tumblr (which you should also check out!)
Let's dive in!
Getting Access #
My first goal was to get admin access on our City IT-issued development machine. To do that, I had to send in an Elevated Access Request, wait a week, make sure the account worked, install City certificates on the laptop for VPN access, call IT a couple of times to fix issues that popped up. (Hey, we were warned that some of this could take a while.)
While I waited, I asked around for the database access we needed. Our project involves working with 25 years of existing City collision and traffic volume data - but to work effectively with that data, we needed to understand it first! I started by requesting read-only access, which was easier for IT to grant. This gave us breathing room to build trust with stakeholders and show value through our user research process, which made it much easier 2 months later when I asked for the full access we needed.
In the meantime, I'd also bought myself valuable technical planning time.
Technical Interviews #
To make an informed plan, however, I first needed to know more about the available tools, services, and technical capacity at the City. Time for some interviews! In parallel with our user interviews, I held technical interviews with key IT groups:
- Open Data: How can we help you publish more collision and traffic volume data? What do your data publishing systems look like? Do you have standards around timestamps, locations, or other fields?
- Geospatial Competency Centre: How often are your basemaps updated? How current is the centreline data on Open Data? How can we help you share more collision and traffic volume data internally?
- Big Data Innovation Team (BDIT): What tools, languages, and types of development are you familiar with? What would make it easier for you to sustain this project after our fellowship?
- Data Owners: Where would I find documentation on these datasets? What pitfalls should I be aware of in using them? Which parts of these datasets are considered sensitive?
After all, these IT groups are also users of the systems we're building, so it's equally important to get their input during the research process!
Data Map #
By this point, insights were starting to roll in from our user interviews. To combine that emerging picture with what I'd learned from technical interviews, I mapped out how data moved around the organization. The first version of this "data map" was hastily scrawled on a whiteboard:
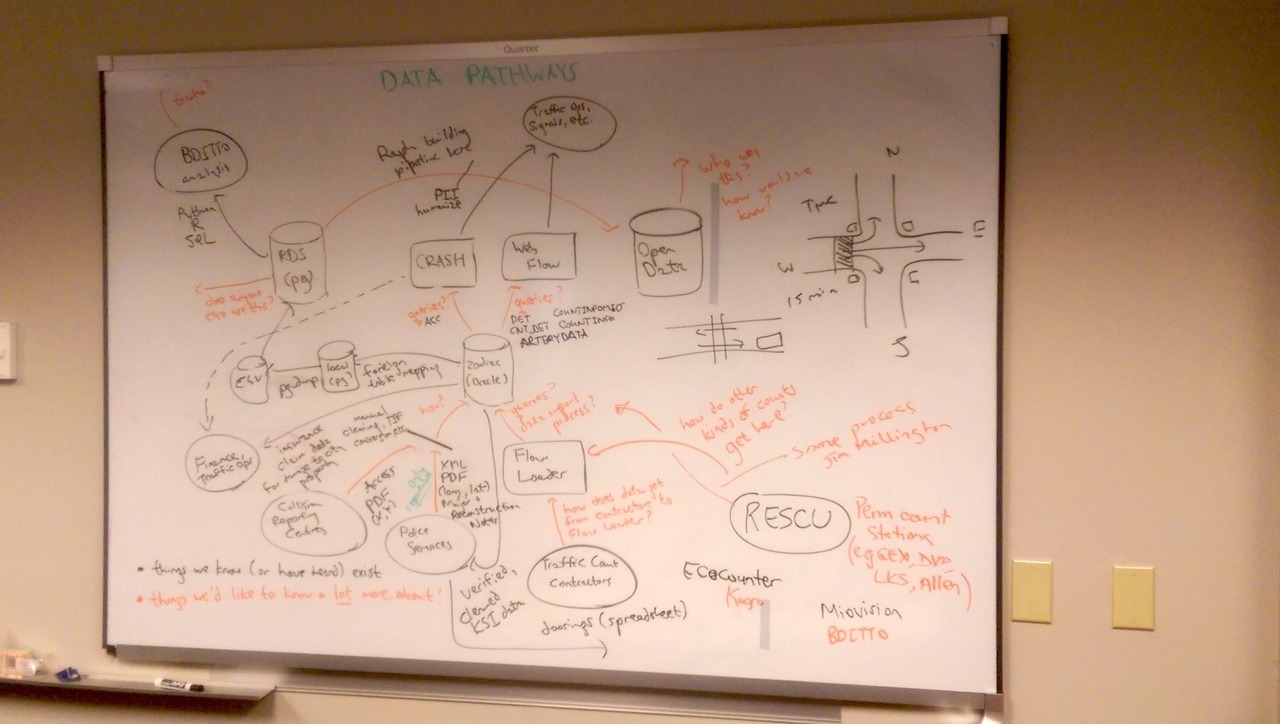
As it turned out, this was the perfect place to put it. Whenever someone in our office noticed a problem with our map, they'd approach us to help fix it - hallway testing isn't just for software! Eventually, we expanded this into a more polished version:
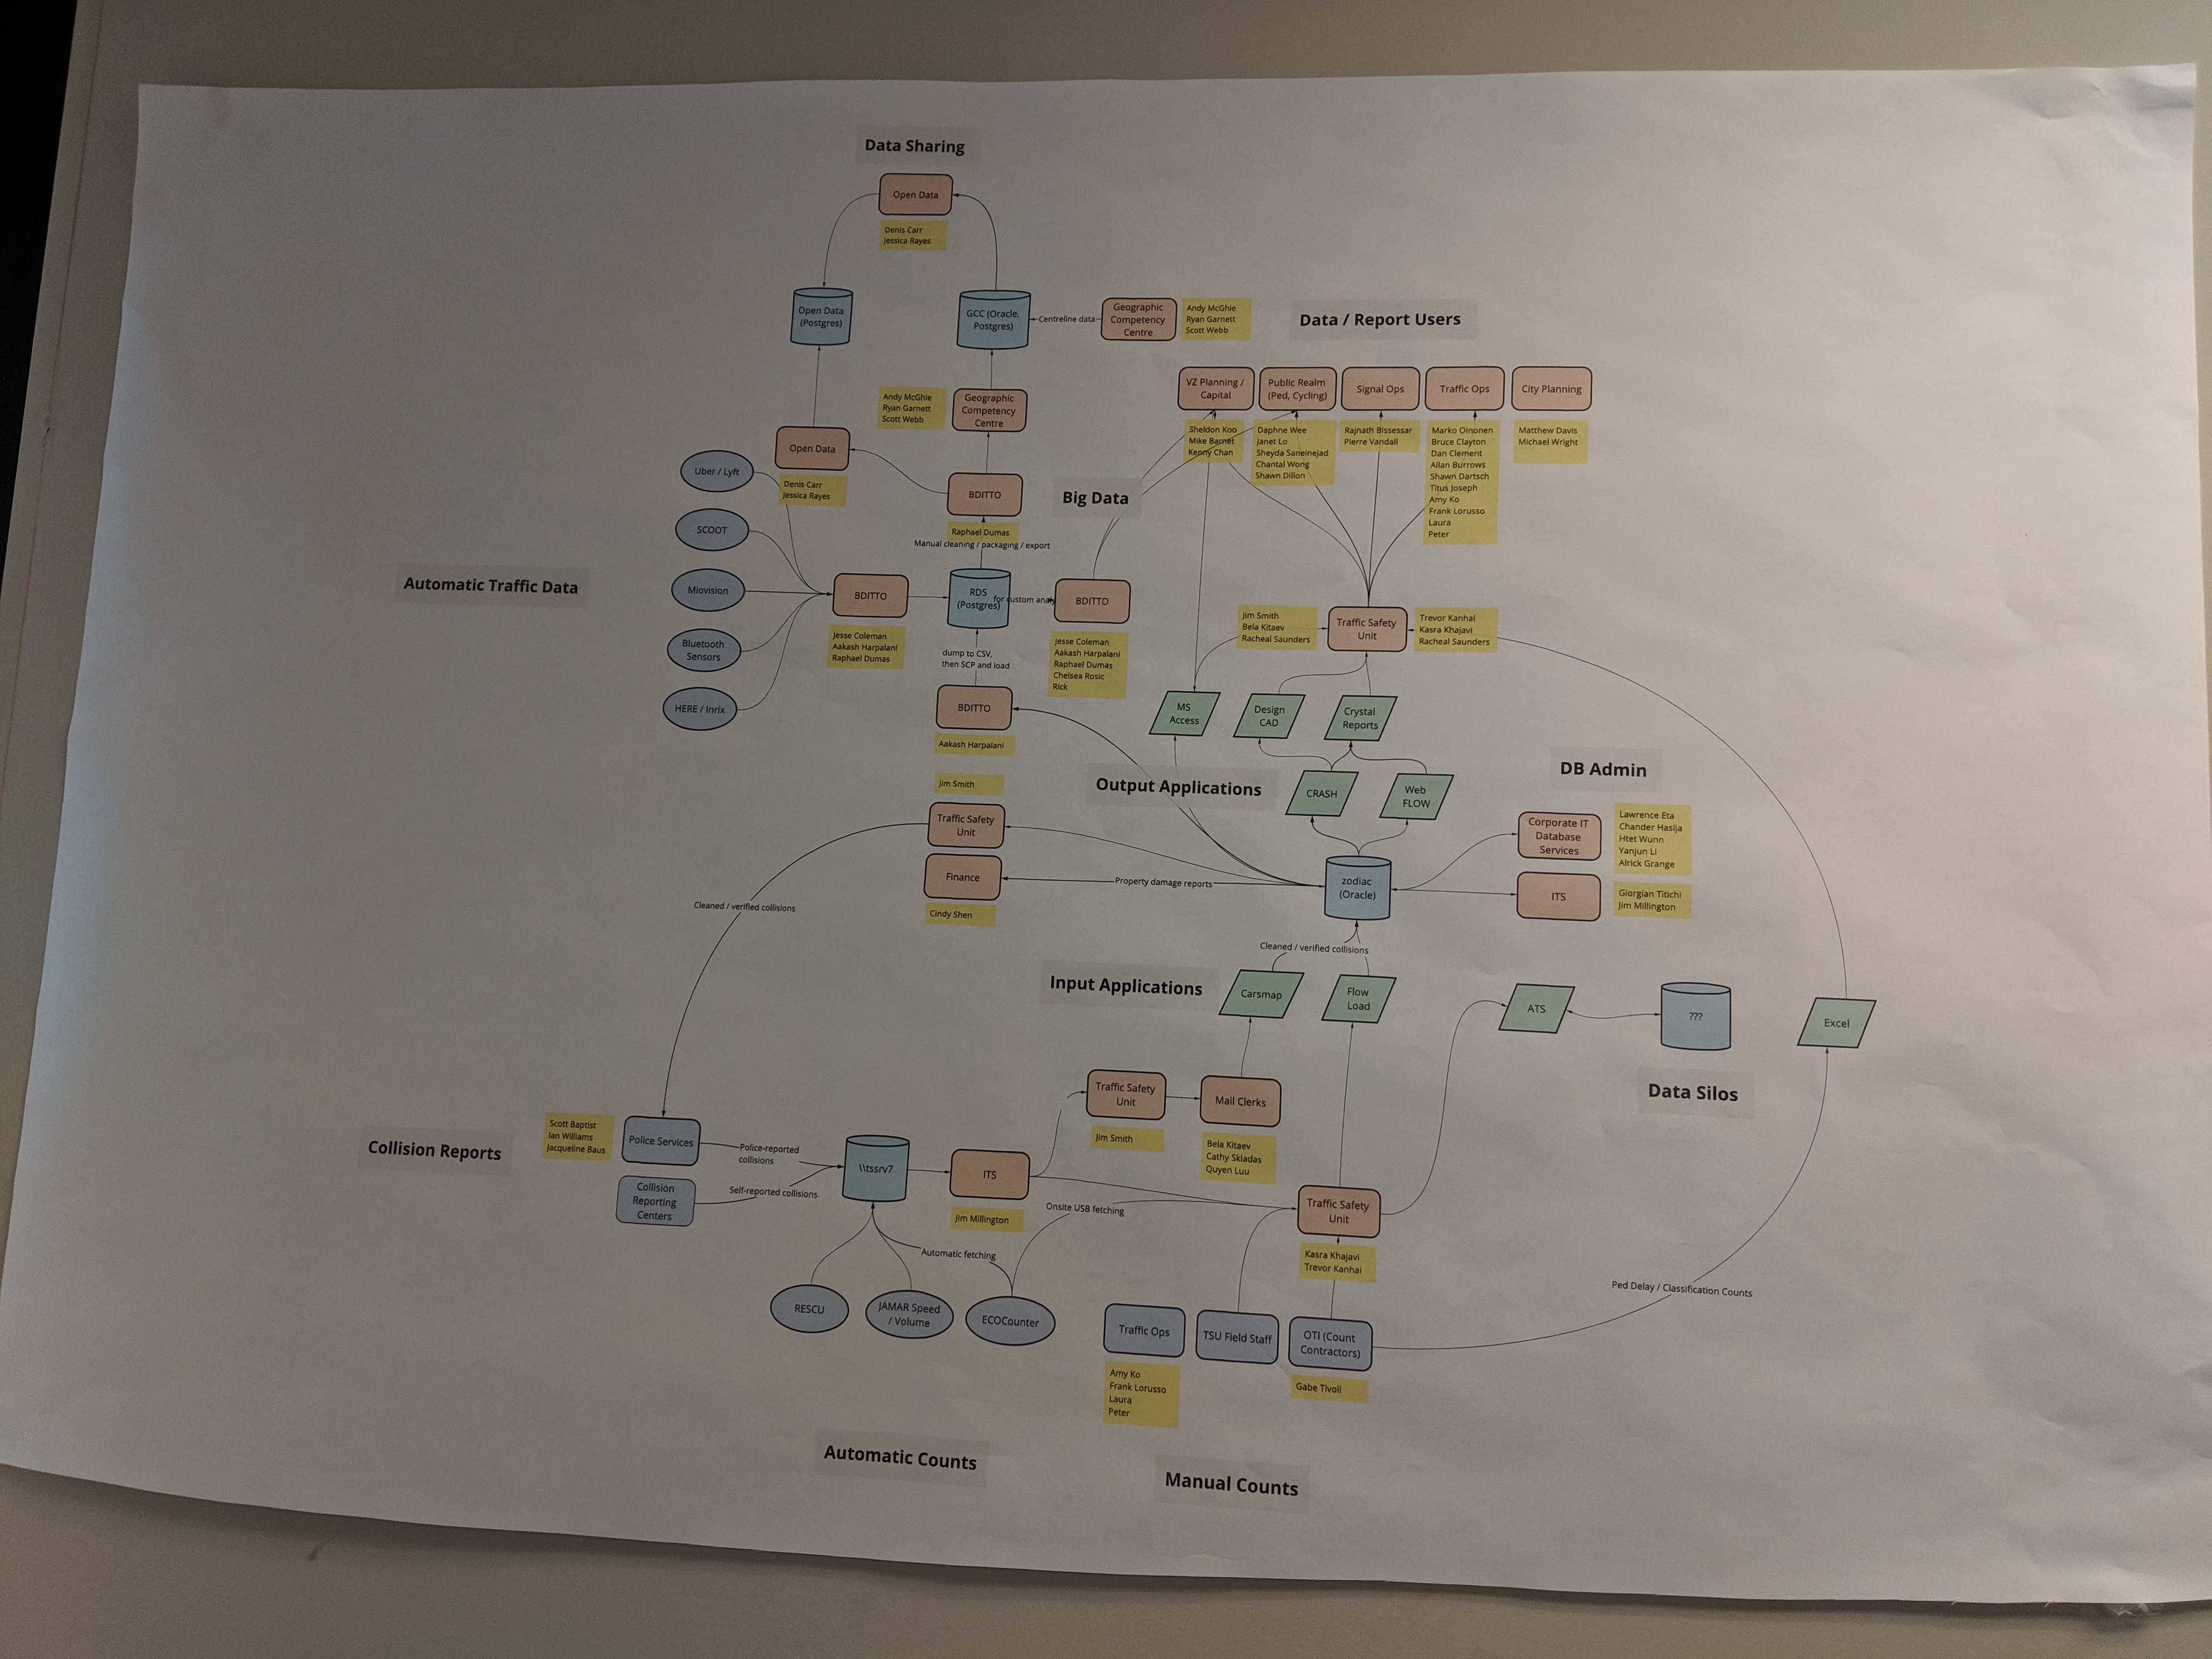
This data map proved invaluable in user research: when we went to interview users, we could situate their use case on this map and understand how they fit in with the broader technical picture.
Tech Strategy #
User interviews went on, and we continued to refine our understanding of the services we'd come to improve. On the tech side, this allowed me to coalesce technical requirements, goals, and opportunities into a Tech Strategy:
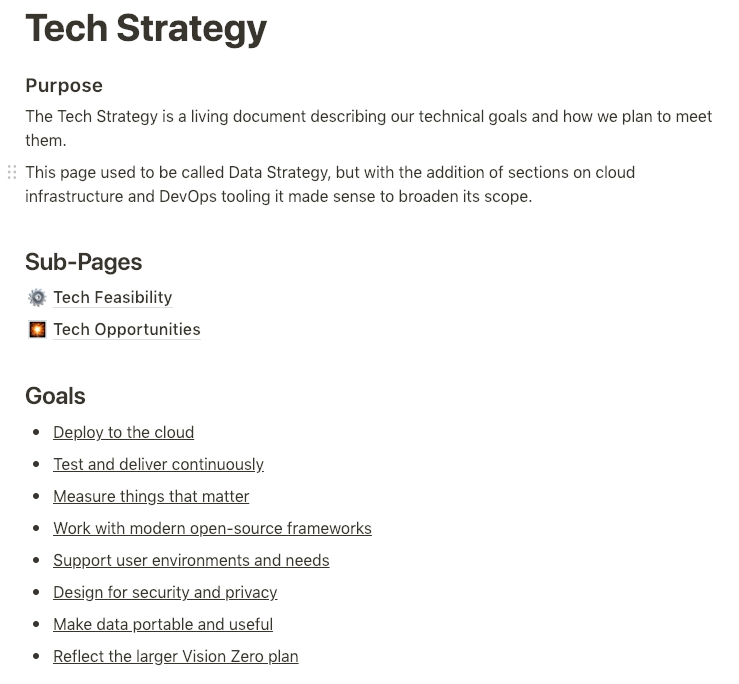
As you can see, it's a living document rather than a strict specification: I update this as requirements, goals, and opportunities change. You can read the full text on Notion. This gave us a way to clearly communicate our technical plans to our stakeholders, and it gave them something specific to provide feedback on.
The Cloud #
We'd been discussing cloud deployment from Day 1. As it turned out, BDIT had a EC2 instance and PostgreSQL RDS, and they were looking to serve webapps from it. This led to an early win-win: I helped them set up nginx, they shared sudo access to their EC2 instance.
This was only a temporary solution, though - fine for early prototyping, but you don't want to be running production software on someone else's experimental data analysis machine. On BDIT's suggestion, we reached out to Cloud Services for an initial chat, where they explained their available AWS stack to us:
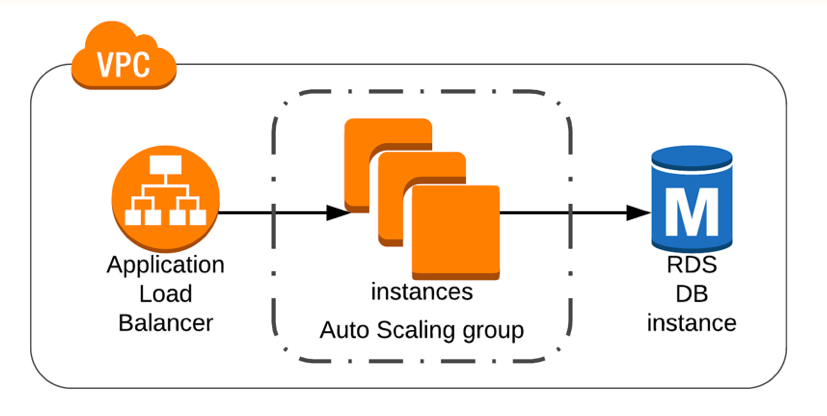
Here we have an autoscaling pool behind an Elastic Load Balancer, all backed by a PostgreSQL RDS, and all within a Virtual Private Cloud. Perfect! I updated our Tech Strategy to take this new environment into account and came up with these specific asks:
- a main stack for serving our webapp;
- a transfer EC2 instance for moving data from Oracle to PostgreSQL.
Having a clear Tech Strategy shifted this discussion from "OK, so what do you need?" to "What else can Cloud Services provide?" A lot, as it turned out:
- ready-made CloudFormation templates to provision EC2 instances;
- production-ready, City-approved SSL certificates;
- help with setting up OpenID Connect-based authentication;
- ongoing work to move to the AWS Canada (Central) region to mitigate data territoriality concerns;
- CodeDeploy / CodePipeline integration for CI / CD.
In turn, the backing of Cloud Services helped convince stakeholders that we could deploy to the cloud while preserving data privacy.
Choosing a Tech Stack #
With our Tech Strategy in hand, and our City-approved AWS stack set to arrive, it was time to decide on a tech stack for the product.
This part depends on many factors:
- the development team: Who's developing this, and what skills do they have? Which tools / frameworks are they most familiar with?
- the project: What's the timeline and budget for the project? How robust does it have to be?
- the users: What problem do they need solved? What forms do potential solutions take? How technically savvy are they?
- the organization: What skills does the organization have access to? What will help them maintain the product? What are their requirements around security, accessibility, perfomance, open-source licensing, etc.?
- the tech ecosystem: Which tools and frameworks solve the problem? What are the tradeoffs between them? Which tradeoffs make the most sense?
You can't answer these questions without a clear direction based on user and technical research - otherwise, you're stabbing in the dark! Getting to that stage took several weeks, a couple dozen interviews, countless email chains, face-to-face meetings with BDIT, and enough post-it notes to put some 3M exec's kids through school.
It took a lot of work, but we got to a working hypothesis:
We believe that by creating an integrated data platform for Data Supervisors and Traffic Ops, we’ll achieve a seamless count and collision request to warrant process as well as trust and shared understanding.
Given everything we'd learned, this likely meant a user-facing web application plus some eventual scripting work to automate data intake, validation, and publishing pipelines. From here, I could plan the webapp tech stack.
Database #
PostgreSQL was the clear choice here. BDIT has extensive experience with PostgreSQL, Cloud Services offers PostgreSQL, Open Data is using PostgreSQL already, GCC is moving onto PostgreSQL, and so on. Everywhere we looked, divisions were either already using PostgreSQL or seriously considering it.
It helps, of course, that PostgreSQL is a mature, well-tested database platform with excellent geospatial support through PostGIS.
Web Application Server #
Python and JavaScript were the two main candidates here, as both were supported by Cloud Services and familiar to BDIT. I decided on JavaScript, as I have more experience with node.js-based webapps. (This is a reasonable rule of thumb: all else being equal, use what you're most familiar with!)
From there, it was a matter of picking a node.js-based web framework. express used to be the default choice here, but development has slowed recently to the point where its future is uncertain. I ultimately settled on hapi, initially developed by Walmart Labs to handle Black Friday traffic. It's popular, the community is active, there's decent documentation, it supports async route handling, and it comes with out-of-box security header support:
const options = {
  // other stuff...
  routes: {
    security: {
      hsts: {
        maxAge: 2592000,
        includeSubdomains: true,
        preload: false,
      },
      xframe: true,
      xss: true,
      noOpen: true,
      noSniff: true,
      referrer: false,
    },
  },
};
Web Frontend #
Reactive component frameworks like React and Vue take an age-old problem in webapp UI development - keeping the UI in sync with changing state - and they solve it well. They can be overkill for smaller projects, but the modularity they enforce makes it much easier to manage larger webapp projects.
I chose Vue here: I'm more familiar with it than with React, and I prefer its clear separation of HTML, JS, and CSS code. (See the above rule of thumb.)
Static Resources Toolchain #
This is usually the most confusing part for new webapp developers: transpiling, minifying, bundling, preprocessing, and so on. Where to start? Which tools to pick? How to configure them?
At the same time, these tools are all valuable, as they enable the use of modern HTML, JS, and CSS features while maintaining cross-browser support:
- browserslist defines supported browsers;
- PostCSS plus postcss-nested preprocesses CSS, allowing you to use modern CSS features while maintaining compatibility with browsers defined in
browserslist; - Babel does for JavaScript what
postcssdoes for CSS, allowing you to use ES6+ features while maintaining browser support; - webpack bundles static resources and helps with production tasks like minification;
- webpack-dev-server offers hot-reloading in development, so you can instantly see changes to frontend code upon save.
See our Vue webapp template for more details on configuration here.
Source Control #
It is easy to shoot your foot off with git, but also easy to revert to a previous foot and merge it with your current leg.
Every development project should start with source control. In our case, the Big Data Innovation Team uses both private and public repos on Github. Our project is internal-only, so I made a private repo on Github.
Our Vue webapp template is based on that private repo, but with anything specific to the City environment (IP addresses, other credentials) removed.
Sample Application #
Once I had the tech stack picked, I built a sample application that exercised every part of this stack.
For source code, head over to bdit-webapp-template.
There's a login form tied to hapi-auth-cookie:
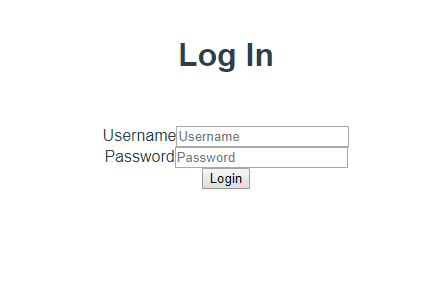
For now, the username and password are hardcoded in lib/config.js. This file is explicitly .gitignore'd to prevent leaking credentials through source control.
After you log in, you're greeted with this homepage:

There's a logout feature, to test that we can clear our authentication cookie properly. Login and logout are handled by POST /login and POST /logout respectively in our hapi-based REST API server.
Clicking on "About" brings you to the truly dynamic part:

This is where the database and REST API server come in! There's a single table "TEST"."COUNTER" with a single row:
psql> SELECT * FROM "TEST"."COUNTER";
 n
---
 0
(1 row)
Our REST API server offers three counter-related endpoints:
GET /countergets the current value of the counter;PUT /counteradds 1 to the counter;DELETE /counterresets the counter to 0.
When the "About" page is loaded, we make a request to GET /counter to initialize the counter state in our frontend. "Increment" makes a request to PUT /counter, "Reset" makes a request to DELETE /counter.
In development, frontend static resources are served from webpack-dev-server, which proxies requests from https://localhost:8080/flashcrow/api/(.*) to our REST API server at https://localhost:8081/$1:
// vue.config.js
module.exports = {
  publicPath: '/flashcrow/',
  devServer: {
    host: 'localhost',
    https: { key, cert },
    proxy: {
      '/flashcrow/api': {
        target: 'https://localhost:8081/',
        pathRewrite: {
          '^/flashcrow/api': '',
        },
      },
    },
  },
};
We serve the application at /flashcrow, mainly so that we have the flexibility to run other applications on the same machine if needed for the project.
For production, npm run build writes static resources to dist. To serve those alongside our REST API server from a single port, I brought in nginx as a front-end proxy:
location /flashcrow {
    alias /path/to/dist;
}

location /flashcrow/api {
    rewrite /flashcrow/api/(.*) /$1 break;
    proxy_pass http://localhost:8081;
}
The combination of rewrite and proxy_pass here achieves much the same thing as devServer.proxy above.
Testing Infrastructure #
With a sample application up and running, it was time to focus on making sure we could test everything.
During the Vue CLI project initialization, I also set up Jest for unit testing and Cypress for end-to-end browser testing. @vue/cli-plugin-unit-jest sadly isn't compatible out-of-box with @babel/core yet, but you can follow these instructions to get it working.
For Cypress, I ran into a well-known issue with installing Cypress binaries behind a corporate proxy. To fix this, I had to download the binaries manually, then move them into the appropriate Cypress cache directory; this causes the post-install script to skip downloading.
Component Testing #
With @vue/test-utils, we can mount components within Jest suites:
import { shallowMount } from '@vue/test-utils';
import Home from '@/views/Home.vue';

test('Home.vue renders properly', () => {
  const wrapper = shallowMount(Home, {
    propsData: { },
  });
  expect(wrapper.contains('div')).toBe(true);
});
You can do plenty more with @vue/test-utils: issue mouse / keyboard events to specific elements within the component, test lifecycle methods, and so on.
Database Testing #
CounterDAO is our data access object for handling counter fetches and updates in the sample application. To test it, we can just import CounterDAO from a Jest suite like any other library:
import db from '@/../lib/db/db';
import CounterDAO from '@/../lib/db/CounterDAO';

test('CounterDAO works properly', async () => {
  await expect(CounterDAO.reset()).resolves.toEqual(0);
  await expect(CounterDAO.get()).resolves.toEqual(0);
  await expect(CounterDAO.increment()).resolves.toEqual(1);
  await expect(CounterDAO.get()).resolves.toEqual(1);
  await expect(CounterDAO.increment()).resolves.toEqual(2);
  await expect(CounterDAO.get()).resolves.toEqual(2);
  await expect(CounterDAO.increment()).resolves.toEqual(3);
  await expect(CounterDAO.get()).resolves.toEqual(3);
});

afterAll(async () => {
  db.$pool.end();
});
Note the call to pg-promise's db.$pool.end() at the end: without this, the event loop hangs forever, and the test eventually times out!
REST API Testing #
And our REST API layer, which we can also test in a Jest suite using request-promise-native:
test('counters work', async () => {
  await fcLogin();
  let response;

  response = await fcApi('/counter', { method: 'DELETE' });
  expect(response.counter).toBe(0);
  response = await fcApi('/counter');
  expect(response.counter).toBe(0);

  response = await fcApi('/counter', { method: 'PUT' });
  expect(response.counter).toBe(1);
  response = await fcApi('/counter');
  expect(response.counter).toBe(1);

  await fcApi('/counter', { method: 'PUT' });
  response = await fcApi('/counter', { method: 'PUT' });
  expect(response.counter).toBe(3);
  response = await fcApi('/counter');
  expect(response.counter).toBe(3);
});
This is set up to run against https://localhost:8080, which means running webpack-dev-server and node server.js in development.
End-to-End UI Testing #
Finally, we have end-to-end UI tests in Cypress:
$ clear
describe('Counter Test', () => {
  before(() => {
    cy.login('foo', 'bar');
  });
  beforeEach(() => {
    Cypress.Cookies.preserveOnce('session');
    cy.visit('/');
    cy.get('a#link_about').click();
  });
  it('Reset counter', () => {
    cy.get('button#btn_reset').click();
    cy.contains('span#info_counter', 'Counter: 0').should('not.be.null');
  });
  it('Increment counter', () => {
    cy.get('button#btn_reset').click();
    cy.get('button#btn_increment').click();
    cy.contains('span#info_counter', 'Counter: 1').should('not.be.null');

    cy.get('button#btn_increment').click();
    cy.contains('span#info_counter', 'Counter: 2').should('not.be.null');
  });
});
Fantastic! We can test our application from top to bottom, right out of the gate.
Code Style #
Always code as if the guy who ends up maintaining your code will be a violent psychopath who knows where you live. Code for readability.
The Code for Canada fellowship is 10 short months: 4 down, 6 to go. I might be the only developer on this project right now, but what about after I'm gone? What if we get another developer on the team mid-fellowship? (This isn't purely hypothetical: BDIT mentioned we might be able to get 1-2 more devs.) Professional software development means writing code others can read and modify.
A big part of that is code style, a set of rules that describe what readable code means in your organization. To help set that up, Vue CLI comes with lint-staged and @vue/cli-plugin-eslint, with @vue/eslint-config-airbnb installed to use AirBnB's excellent JavaScript style guide by default.
I added pylint for Python, PSScriptAnalyzer for PowerShell scripts, and shellcheck for Bash scripts. This was also a good point to integrate unit testing into our pre-commit hook:
{
  "scripts": {
    "test:unit": "jest --changedSince=master",
    "pre-commit:lint": "lint-staged",
    "pre-commit:audit": "npm audit"
  },
  "gitHooks": {
    "pre-commit": "npm-run-all pre-commit:* test:unit"
  },
  "lint-staged": {
    "*.js": [
      "vue-cli-service lint",
      "git add"
    ],
    "*.vue": [
      "vue-cli-service lint",
      "git add"
    ],
    "*.py": [
      "pylint",
      "git add"
    ],
    "*.ps1": [
      "python ./scripts/dev/ps1_linter.py",
      "git add"
    ],
    "*.sh": [
      "shellcheck --shell=bash",
      "git add"
    ]
  }
}
Note that I've also added npm audit, which flags npm packages in your project with known vulnerabilities. Solid pre-commit hooks are an essential part of maintaining code readability, quality, and security!
Last Thoughts #
Phew! It sounds like a lot of work, but some technical due diligence up front saves loads of effort later. It's always easier to integrate best practices like end-to-end testing, pre-commit hooks, etc. into a fresh project than it is to shoehorn them into an existing legacy codebase. If you have the chance, why not do it when it's easy? Your future team will thank you.
I've also been busy setting up a replication pipeline between Oracle and PostgreSQL, which I might explain in a future blog post (time permitting). We'll soon be starting in on development, so look forward to more technical deep-dives!
- Previous: The Limitations of Real